I’ve been recycling my kitchen scraps, cardboard and paper waste for over 5 years now.
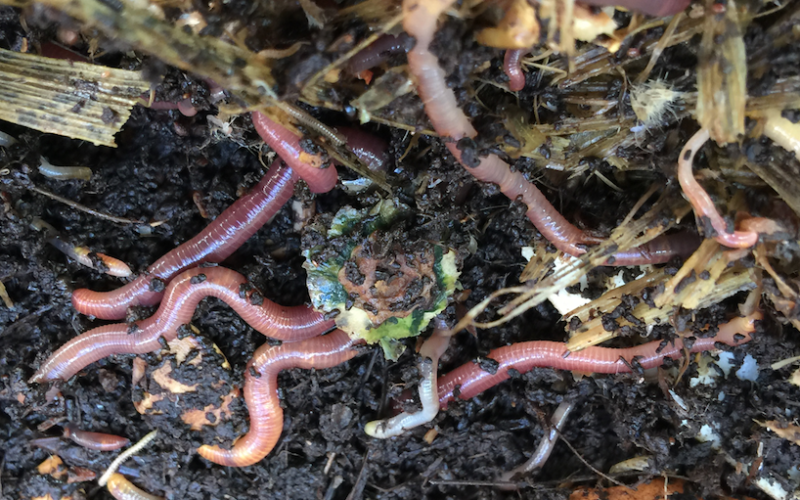
I do it using worms. Specifically … Red Wiggler worms.
Vermicomposting (composting with worms) is very easy, simple, and fun to do. Kids love it too. I have neighborhood kids regularly come over and ask to see the worms. (And here are some fun facts about worms they might enjoy as well.)
And what’s not to love about vermicomposting? These compost worms help improve our overall environment; they recycle our waste products, eat bad bacteria and poop out good bacteria, they remediate soils that have had heavy metal damage, and they create conditions to help our plants grow and thrive.
How to Start a Worm Bin
I initially started vermicomposting with the indoor Worm Factory 360, which was an excellent starter kit. Eventually, I ventured off to see if I could create an outdoor population that would survive extreme high and low temperature ranges. That worked, so now I do my vermicomposting outside.
With that being said, there are many different ways to start a worm bin.
You should first determine the type of worm bin that you would like to have, as there are many different options. Be sure to read: 8 Worm Bin Ideas – How To Make A Homemade Worm Compost Bin
Worm Bin Starter Kit
If you’d rather not make your own bin, I would suggest starting with the Worm Factory 360. As I mentioned above, this is the kit I started with with.
The Worm Factory 360 is a complete system that comes with 4 gridded stacking trays, initial bedding ingredients (coconut coir, shredded paper, minerals, and pumice), a spigot, a harvesting tray and other accessories.
The trays work in a rotation, where the oldest waste is in the bottom tray, and the newest waste is in the top tray.
As the worms finish the food in the bottom tray, they will migrate through the bottom holes of the tray above.
You will initially start with one tray, and work up to 4 trays, depending on the amount of waste and worms you have.
Finished compost is harvested from the bottom tray.
The average processing time for a tray is 90 days before harvest.
Here is a video demonstration of the Worm Factory 360:
How To Make Worm Bin Bedding
The bedding is what the worms live in, and also what they breakdown. You will only need to make bedding in the beginning, to give your worms a good start.
There is no single way to make the perfect bedding.
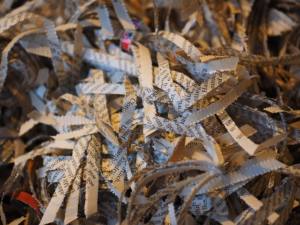
What I recommend doing, is to cover the bottom of your worm bin with a high carbon source, such as 5 to 10 full pages of newspaper, or some cardboard. This will help soak up moisture at the bottom. This will also create a bottom for your tray if your starting tray has open grids (like the ones in the Worm Factory 360), making it so that bedding, food waste and worms won’t fall through the holes.
Next, take a full newspaper (but not the slick color paper), and shred it into one-inch strips, and place that over the bottom and mix with either garden soil, compost or hydrated coconut coir.
You’ll want to add some grit to the mixture, such as pumice or ground up eggshells. This helps worms digest their food, since worms do not have teeth.
The moisture level should be not too dry and not too wet. It should be the consistency of a wrung out sponge.
Below are 2 video demonstrations on bedding. The first video uses a simple bedding, and the second video is what I would call “super” bedding.
Simple Bedding Video Demonstration:
“Super” Bedding Video Demonstration:
Worm Bin Airholes
Worms need to breathe oxygen, just like we do. But they don’t have lungs. They breathe through their skin.
Red Wigglers usually live in the top 6 inches of the soil, where there is still plenty of oxygen.
If there is too much water in the bin, the worms will drown due to a lack of oxygen.
So with any worm bin, there has got to be air holes.
How To Aerate A Worm Bin
If you use the Worm Factory 360, the worm bin will already have aeration as part its design. If you are making your own worm bin however, you’ll want to make sure you include air holes, or your worms will not survive.
Here’s a video demonstration on how to do that. (You may or may not choose to drill holes in the bottom.)
Worm Bin Drainage
Food holds a lot of moisture, and as it breaks down, this moisture is released. This excess liquid can build up at the bottom of your bin, and if there is not enough drainage, worms can die.
This is one of the reasons I like to have cardboard at the bottom of the bin, because cardboard helps to absorb some of that excess moisture.
Depending on where you plan on placing your worm bin, you might add drainage holes or make a spigot.
Worm Bin Juice
So what exactly is that juice that is in the bottom of the worm bin? Is that juice compost tea?
Probably not. The juice is most likely excess moisture from the foods that have recently been added. I don’t consider this to be compost tea.
Compost tea is a microbial rich brew made from Red Wiggler excrements. Compost tea is a mixture of your finished compost, and water.
Here’s a video demonstration on how to make compost tea:
Where To Buy Worms For Vermicomposting
I got my initial pound of worms from a local source who was advertising on Craigslist. If you have a bait shop in the area, you can call and find out if they carry Red Wigglers.
One of the easiest methods of obtaining worms is to purchase them online. I recommend Uncle John’s Worm Farm.
What do you feed worms?
Your compost bin should have equal nitrogen (green material) to carbon (brown material).
Produce scraps are high in nitrogen and cardboard/paper/junk mail is primarily carbon. Your bin should have about a 50-50 split between plant material and paper material.
Here’s an excellent list of foods from Eureka Recyclings’s Zero Waste program on what you can feed your worms.
Worm Food (Green Material)
- Fruit scraps, peels, rotted
- Vegetable scraps, peels, rotted
- Tea bags/loose tea
- Coffee grounds and filters
- Mushrooms
- Beans/legumes
- Melon rinds
- Corn cobs
- Seeds/pits
- Egg shells
- Breads
- Baked goods
- Flour
- Cooked grains (rice, pasta, oatmeal)
- Herbs and spices
- Flowers
- Nail clippings
- Dustpan sweepings
- Hair (human and pet)
- Q-tips (cardboard sticks)
- Leftovers – as long as not oily or salty
 Worm Bedding (Brown Material)
- Newspaper
- Shredded paper
- Crumbled leaves
- Shredded egg cartons
- Tissues
- Paper napkins
- Paper towels and roll tubes
- Toilet paper roll tubes
- Peat moss
- Coconut fiber (Coir)
- Wood chips
- Hay
- Dried grass clippings
- Corn husks
- Dryer lint
DO NOT Feed Your Worms:
- Meat or bones
- Grease/fat/oil
- Salt/salty foods
- Dairy products
- Pet or human feces
- Heavily colored paper
- Plywood
- Particle board
- Treated wood
- Non-organics (glass, plastic, metal)
- Colored newsprint
- Diseased plants
- Fireplace Ash
If you chop up, freeze or microwave food scraps first, it will make it easier and faster for the worms to break it down. Make sure that these scraps are at room temperature before feeding the worms.
How to store food scraps
I like to have a handy container available to temporarily hold my food scraps, since I don’t feed my worms everyday. If you do this, you’ll want to store it in a way that doesn’t create an odor, and doesn’t attract pests.
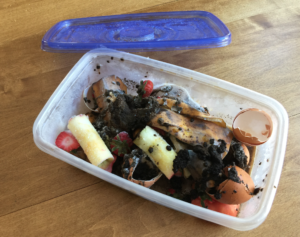 I keep a large sealed plastic container in the freezer that we keep filling up with food scraps. Prior to putting scraps in the freezer, I may cut them into smaller 1-inch pieces to make it easier for the worms to break down. I regularly add coffee grinds, crunched up egg shells, banana peels, vegetable peels, tea bags, apple cores, and food that we left in the refrigerator too long, to that container.
I like freezing it, as it helps to break down the cellulose more quickly, It also helps me to keep my kitchen neat.
When it’s time to empty it, I take it out of the freezer and let my scraps get back to room temperature. Then I mix this with broken up egg cartons, toilet paper rolls, and shredded newspaper. I keep adding newspaper until I get it to the moisture consistency of a ‘wrung out sponge’. Not too wet and not too dry. That’s what I then feed the worms.
Another option is to get a stylish mini compost bin, which you can place on a kitchen counter. These have airtight lids to help to keep odors at bay:
How often do you feed worms?
A pound of worms (which is about 1000 worms) will eat about a ½ a pound of food scraps in a day!
As your worm population grows, the more waste you will be able to recycle.
A worm population can double in size every 60 days. They will however, maintain their population to fit their living conditions.
It takes about 90 days to fully compost waste.
How Often To Water A Worm Bin?
A worm bin should be moist, but not wet. Worms need to breathe, and if there is too much moisture, the worms will drown or try to escape.
You should strive for the moisture consistency of a wrung out sponge.
If it’s too wet, add more broken up egg cartons and shredded newspaper.
Can You Keep A Worm Bin Outside?
Red Wigglers prefer temperatures between 55 and 77 degrees Fahrenheit. If you have a portable bin, you may want to bring it indoors if temperatures get too hot or cold.
The worms in my garden beds do just fine year round, even though temperatures in my area range from below zero to over 90 degrees.
Make sure that there is enough moisture.
What To Do With A Worm Bin In The Winter
I would not leave the Worm Factory 360 outside in hot or cold temperatures, as there is nothing to insulate the worms.
If you decide to insulate, make sure there is still plenty of airflow.
I’ve found that the worms I keep in my outdoor garden beds (to where they are grounded and connected to the earth), do just fine in the winter.
I live in a high altitude location where we sometimes experience below zero temperatures that can extend for several days. We also have high summertime temperatures that can get higher than 100 degrees.
Yet, the original pound of worms that I bought when I first started composting over 5 years ago, have since multiplied and flourished in our outdoor environment. I’ve spread them around our yard, where they now happily live in all my garden beds.
The worms in my garden beds spend the winter munching on a lot of yard waste, such as mulched fall leaves and fallen apples. They also enjoy food and paper waste, which I add directly into the garden beds.
Worm Bin Problems
First off, you’ll want to make sure your bin has a lid of some sort. Even under the lid, I like to have several layers of newspaper, as this helps to trap any potential odors that would attract pests.
There should also be no large holes in your bin for animals to be able to enter.
I periodically scatter food grade diatomaceous earth (ancient algae skeletons) around my grounded outdoor bin. This dehydrates and eventually kills insects like centipedes. The diatomaceous earth does not bother the worms. My guess is that they may use it as grit.
Worm Bin Mold
If you have mold in the worm bin, it means that the worm bin may be too wet. It’s also possible that you are overfeeding your worms, and that there is not enough air flow.
Don’t worry about the moldy food, as the worms will take care of that, but you will want to change the moisture level. Simply add more shredded paper or cardboard to help soak up the moisture, and make sure that there is plenty of airflow.
Worm Bin Mites
It’s possible that you may see little red mites in your worm bin. They may show up if the worm bin is too wet, or if there is more food in the bin than the worms can process.
To remedy this, gently mix in more shredded newspaper or cardboard to help soak up moisture.
Sprinkling some diatomaceous earth over the top of the bin will also help to control the mite population.
Worm Bin Maggots
It’s possible that you may get maggots in your worm bin. They are part of the natural ecosystem, and they can help with the composting. The problem is when their populations grow. Again, sprinkle a little diatomaceous earth around the bin, and it should take care of the maggots.
Worm Bin Ants
If you have ants, it could be that your worm bin is too dry. Add some moisture to it. Your worm bin should have moisture levels similar to a wrung out sponge.
Diatomaceous earth should take care of any ant issues.
Where to Buy Diatomaceous Earth
Most garden centers carry diatomaceous earth, or you can buy a bag on Amazon.
How To Harvest A Worm Bin
Worms will migrate to wherever the food is, which makes harvesting compost easy. If you do a stacking method of composting, the worms will migrate to the top trays, with the bottom trays ready to be harvested. If you are harvesting compost in one-level bin, you can rotate where you add new food.
Here is a video demonstration on how to harvest compost:
The Bottom Line: How to Start a Worm Bin
I love seeing how these little Red Wigglers can transform my household waste, and turn it into life-giving nourishment for my indoor and outdoor plants.
Worms need the proper living conditions to make this happen. They need just the right amount of moisture, decent air circulation, good bedding, and both nitrogen (food scraps) and carbon (paper/cardboard) sources of food.